Performance mode
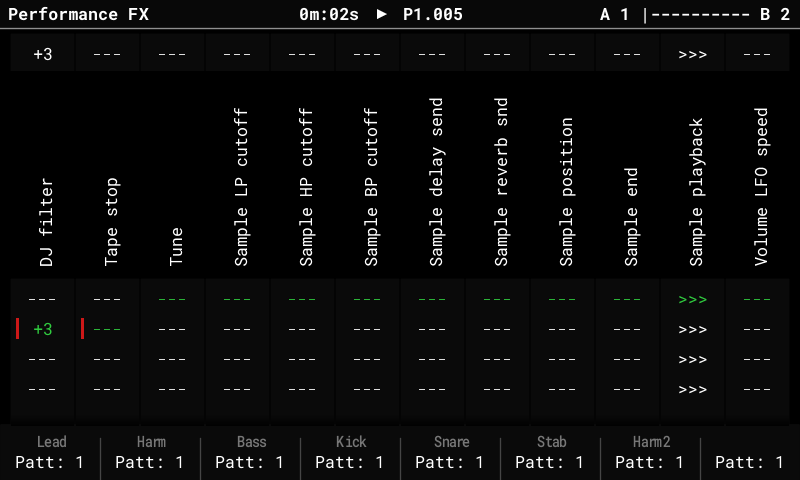
The Performance screen plays effects live from the pads: 12 columns, each an effect type, with 3 stored values per column on the pad rows. The fork adds scenes with a crossfader, a bank of 16 scenes, master FX (DJ filter, tape stop) and MIDI CC columns that play an external synth's parameters.
Basics (as in stock)
- Press Performance. Hold a pad to play that column's value on its row; release to go back. The top row shows what's playing.
- Rec (edit mode): the encoder changes the value of the selected row. In the fork, a tapped row can be edited with the encoder without holding the pad.
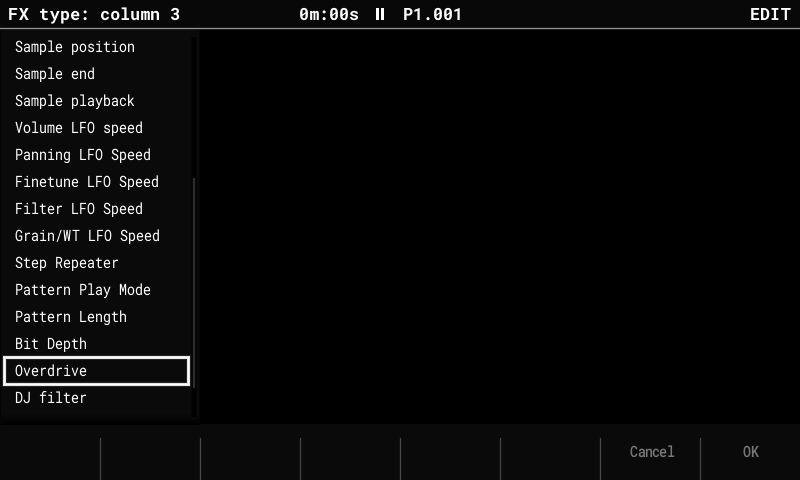
- Choosing a column's effect type (fork): in edit mode, Up / Down open a list of every type on the column's current one, on the left of the screen (the title names the column). Move with the encoder (Shift + a quick turn for bigger jumps) or Up / Down, then press OK (F8). Cancel (F7), Left / Right or Rec close it without changing anything (for MIDI CC, Left / Right move between its lists instead). Nothing is applied until OK, and the F keys don't switch track effects while the list is open. The row values stay when the new type has the same range (e.g. Volume to Panning); otherwise they're cleared as in stock. Stock stepped the type with Up / Down, applying each one on the way.
 - The F keys turn the effects on or off per track (lit = on). Shift + F key mutes
the track. Left / Right (outside edit mode) switch the F keys between tracks 1–8 and
9–16. In the fork the F keys are remembered: leaving the screen and coming back keeps
them, and they're saved with the project (stock turns every track on again).
- Effect types include Volume, Panning, Tune, Low-pass / High-pass / Band-pass, Delay and Reverb send, Start / End pos, Direction, the LFOs, Repeater, Play mode, Length, Bit depth and Overdrive, plus the fork's DJ filter, Tape stop and MIDI CC.
Scenes and the crossfader
A scene stores a row for every column. The crossfader's two ends, A and B, each play a scene; the encoder (outside edit mode) or MIDI CC 63 fades between them.
- Continuous values (volume, filters, sends …) fade smoothly. Filters cross over at the middle (a low-pass on A and a high-pass on B don't fight). Stepped effects (Repeater, Direction, Tape stop …) switch at the middle. With fader ranges, each column can move over its own part of the fader instead.
- The title bar shows the pair (
A 1 |------| B 2) and where the fader is. Rows of the scene on A are marked red, on B blue; the pad LEDs and the green (active) row follow the fader. - A pad pressed on a column the scenes drive takes it over: its row plays and turns green. The next fader move hands the column back to the scenes.
Store and clear while playing
| Keys | Does |
|---|---|
| Shift + Left / Right | Store the current pad rows into the scene on A / B. |
| Delete + Left / Right | Clear the scene on A / B. |
| Hold pads + Shift / Delete + Left / Right | Store / clear only the held columns. |
Which tracks get the effects
Storing a whole scene (Shift + Left / Right with no pad held) also stores which tracks have their effects on (the F keys). When that scene is loaded again, the F keys follow it:
- putting it on A or B (from the bank page or a song slot),
- moving the fader past the middle, to the scene on the other side.
So a song can have the drums in the Repeater in the verse and everything in the chorus. A scene stored before (or cleared with Delete) carries no F keys and leaves them as they are. Tapping an F key while a scene plays works as usual; the scene's setting comes back the next time the scene is loaded or the fader crosses the middle. Storing only some columns (pads held) doesn't change a scene's F keys. While a scene is open for editing (bank page, F3 Edit), the F keys show and change that scene's tracks; going back saves them and your live F keys come back.
The scene bank
Press Performance again on the Performance screen to open the scene bank page: 16 scenes, with the ones on A and B marked.
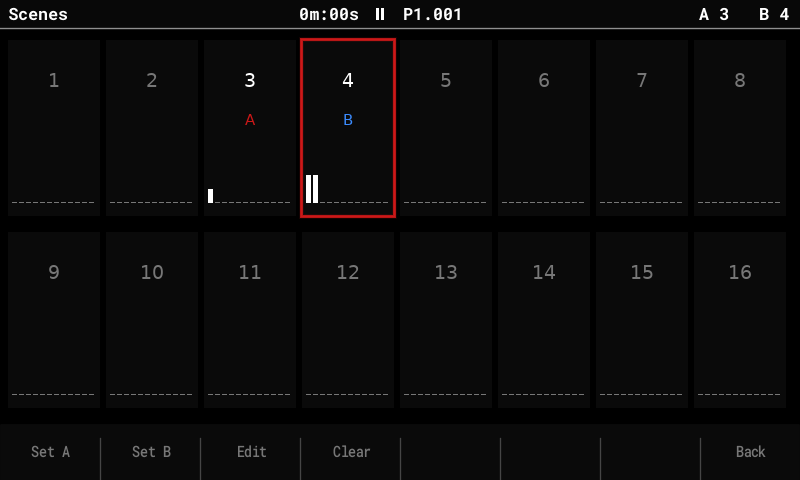
| Key | Does |
|---|---|
| Arrows, encoder or pads | Select a scene. |
| F1 Set A / F2 Set B | Put the selected scene on the fader's A / B end. |
| F3 Edit | Open the scene on the Performance screen ("Editing scene N"): the pads set its rows, and you hear them as you go. Going back saves it. |
| F4 Clear | Clear the selected scene. |
| F5 Export | Save the columns and scenes as a bank file (see below). |
| F6 Import | Load a bank file into this project. |
| F7 Ranges | Set where on the fader each column moves (see below). |
| F8 Back or Performance | Back to playing. |
| Play | Start / stop, as when playing (here and on the Import and Ranges pages). |
Scenes can also be put on the fader by a song: see Song mode.
Fader ranges
By default every column moves across the whole fader: as you push from A to B, all of them change together. A fader range gives a column its own part of the fader, so one push can play a sequence of changes. For example, to build up:
| Column | Scene A | Scene B | Range |
|---|---|---|---|
| LP cutoff | -60 (closed) | 0 (open) | 0–33: opens first |
| Delay send | — | +60 | 33–66: then the delay comes in |
| Step Repeater | — | 1/16 | at 66: then the rolls start |
Scenes A and B stay the same; the range only sets when during the push each column goes from its A value to its B value. Before its range a column holds A's value, after it B's. Pulling the fader back undoes the changes in reverse. A song slot's ramp moves the same fader, so it plays the sequence too.
Open the Fader Ranges page with F7 on the bank page:
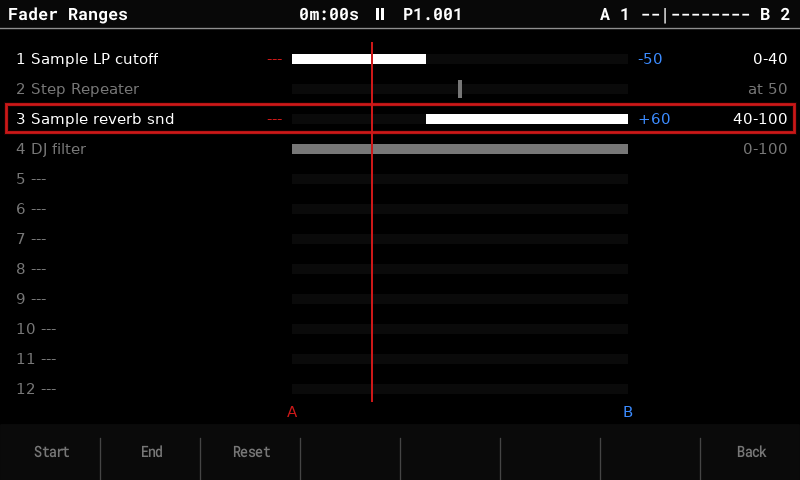
Each column has a row: its bar shows its range between A (left) and B (right),
and the red line is where the fader is now. Left of the bar is the value the column plays
at A (red), right of it the value at B (blue); --- means that scene doesn't set the
column, so it has no effect there. Columns that neither scene on A / B drives are grey. A stepped column (Repeater, Direction, Tape stop …) can't move gradually, so
it has one switch point instead (at 50 by default).
| Key | Does |
|---|---|
| Up / Down or a pad | Select a column. |
| F1 Start / F2 End | Toggle that edge on or off, like Rec. While one is on, its key is framed and the edge is in brackets ([0]-100). A stepped column's switch point moves with either. |
| Encoder | With Start or End on: move that edge. With neither: move the fader, to hear the result without leaving the page. |
| F3 Reset | The selected column back to the whole fader (0–100). |
| F8 Back | Back to the bank page. Performance goes back to playing. |
Ranges belong to the columns of the project and are saved with it and in exported bank files.
Scene bank files
A scene bank is a whole kit in one file, so it can move from song to song: the 12
columns (each one's effect type, its three row values and a MIDI CC column's target), the
16 scenes with their F keys, and which scenes are on A and B. Bank files are
Performance/Scenes/<name>.txt on the card.
- F5 Export opens the keyboard with a name (the bank imported last, else the project's name). Save (F8) writes the file, and asks before overwriting one.
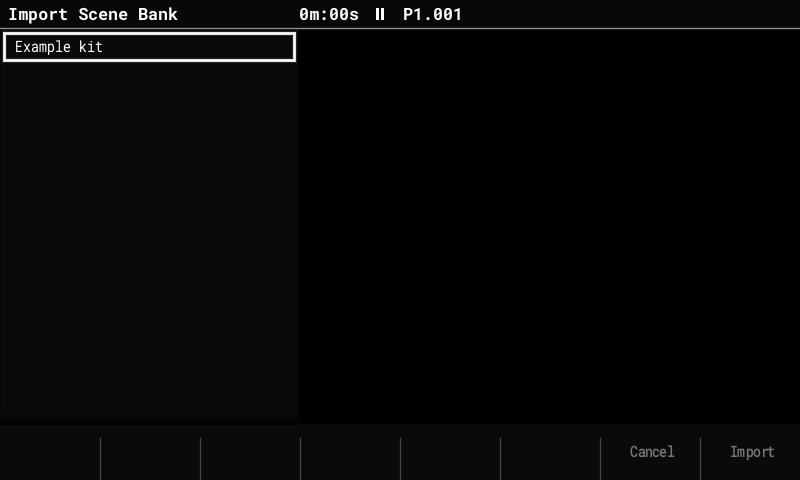
- F6 Import lists the bank files. Move with the encoder or Up / Down, then press Import (F8). Because importing replaces this project's columns and scenes, it asks first. Cancel (F7) or Left closes the list. The live pad rows start empty, and the fader blends the bank's scenes on A and B.
With Performance presets set to Global in Config (the default), the columns are shared by every project, so importing a bank changes them everywhere, just as editing a column does. The scenes always belong to the project.
The bank file
Bank files are text, so they can be written or changed on a computer:
# OpenTracker scene bank
column 1 = Sample LP cutoff: -60 0 60
column 2 = Tape stop: 1 3 5
column 3 = MIDI CC: - 64 127 @ midi 2 slot A
column 4 = ---
scene 1 = 1 0 2 0 0 0 0 0 0 0 0 0
scene 2 fx off = 3 4 12
a = 1
b = 2
column N = type: row 1 row 2 row 3. The type is written as it appears in the type list (any case), and---means an empty column. Values must be in the type's range; a value outside it reads as 0. A MIDI CC column holds CC values 0–127 (-= off) and its target,@ midi 1-16 slot A-F.scene N = ...lists twelve rows, one per column, from 0 to 3, where 0 means the scene doesn't drive that column. Scenes that aren't listed are empty.scene N fx off = ...lists the tracks whose F key the scene turns off (noneturns them all on). Leave the line out and the scene doesn't change the F keys.aandbgive the scenes on A and B.range N = start endgives column N's fader range (0–100). Leave it out for the whole fader; a stepped column's switch point is written asrange N = 66 66.#starts a comment. Unknown lines are ignored.
Master FX
Two effect types act on the whole mix (after all tracks and synths, before the limiter), instead of on each track:
- DJ filter: one value from −100 to +100. Below 0 a low-pass sweeping down, above 0 a high-pass sweeping up, 0 off. It's smoothed, so pads and the fader don't click, and it uses no CPU while off.
- Tape stop: momentary. Hold its pad and the mix slows down to a stop over 1 or 2 steps, beats or bars (the row's value); release and it spins back up. It borrows free sample memory while it runs (shared with resampling), so it can refuse when memory is full.
Set them like any column: in edit mode, Up / Down open the type list; DJ filter and Tape stop are at the end.
MIDI CC columns
A MIDI CC column plays a parameter of an external synth: one of a MIDI instrument's CC slots A–F, on that instrument's channel. Set it up in the type list: highlight MIDI CC, press Right to pick the MIDI instrument (shown with its preset name), Right again to pick the slot (shown with its CC name), then OK (F8).
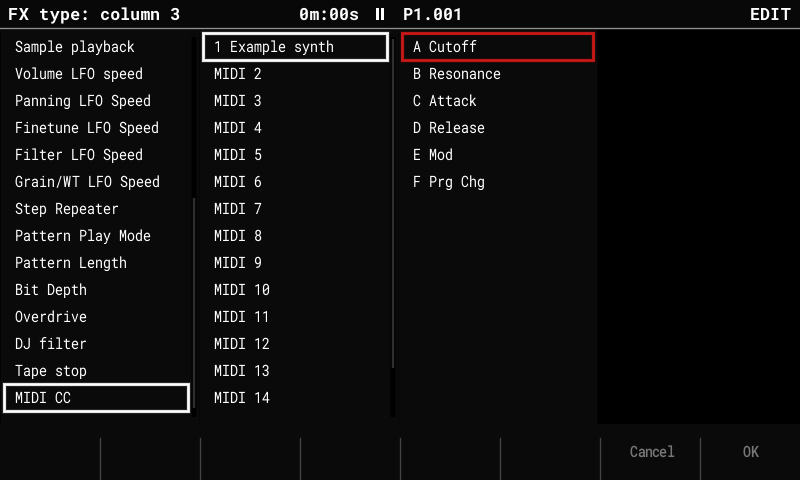
- The column is labelled with the instrument and the CC's name, e.g. MIDI 3 Cutoff. Which CC a slot sends is set on the MIDI instrument's parameters page, so change it there and the column follows.
- Rows hold a value 0–127 (an empty row,
---, is off). A pad press sends its value; the fader, scenes and incoming CC send only when the value changes. Off, or leaving the screen, sends nothing, so the synth keeps its last value. - Several MIDI CC columns play at once, one per parameter. Two columns on the same slot are like two columns of one type: pressing one turns the other off.
- Scenes fade each MIDI CC column on its own, so the fader (or a song's slot ramp) sweeps a synth's filter as it does a sample filter. A scene that doesn't drive the column leaves it at the other scene's value: a CC has no "off" value to fade to.
- If the instrument's MIDI LFO is on the same slot, the column sets the LFO's Center, as a CC step FX does, and the LFO keeps swinging around it.
Saved with the project
The scene bank, the F keys (live and per scene), the master FX and MIDI CC types, the
MIDI CC columns' instruments and slots and the fader ranges are stored in
perf_scenes.bin next to project.mt. Stock firmware and the Tracker Mini see those columns as empty and ignore
the scenes.